Selection Tool Properties
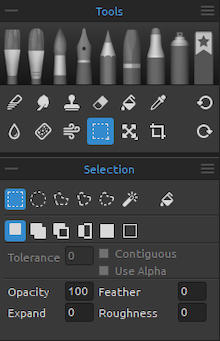 Select a specific area of the canvas and perform
operations on this selected area.
Select a specific area of the canvas and perform
operations on this selected area.
Activate the Selection tool by clicking the button in the Tools panel or by tapping the M shortcut.
There are six types of Selection tools available:
 Rectangle - Create rectangular
selections by clicking and dragging on the canvas. Activate the
rectangular selection by tapping Ctrl + Alt + R (on Windows) /
Cmd + Alt + R (on macOS).
Rectangle - Create rectangular
selections by clicking and dragging on the canvas. Activate the
rectangular selection by tapping Ctrl + Alt + R (on Windows) /
Cmd + Alt + R (on macOS).
 Ellipse - Create elliptical
selections by clicking and dragging on the canvas. Activate the elliptical selection by tapping Ctrl + Alt + E (on
Windows) / Cmd + Alt + E (on macOS).
Ellipse - Create elliptical
selections by clicking and dragging on the canvas. Activate the elliptical selection by tapping Ctrl + Alt + E (on
Windows) / Cmd + Alt + E (on macOS).
To transform the rectangular and elliptical selection, click the Transform tool in the Tools panel or use shortcut Ctrl + T on Windows or Cmd + T on macOS.
You can move, scale selection propotionally, rotate or flip selection horizontally or vertically.
Use Shift to scale the selection horizontally, vertically or both.
Use Alt to scale the selection relative to its center.
Use Shift to enable lock rotation at a 15-degree angle. You can change the default angle in Preferences > Tools > Transformation.
 Polygon - Create polygonal
selections. Click to place a corner point, release the mouse button and
click to place the next point. To finish creating a polygonal selection
either click on the first point again, make a double-click or hit Enter - the last point
will be linked back to the first point automatically.
Activate the polygonal selection by tapping Ctrl + Alt + P (on
Windows) / Cmd + Alt + P (on macOS).
Polygon - Create polygonal
selections. Click to place a corner point, release the mouse button and
click to place the next point. To finish creating a polygonal selection
either click on the first point again, make a double-click or hit Enter - the last point
will be linked back to the first point automatically.
Activate the polygonal selection by tapping Ctrl + Alt + P (on
Windows) / Cmd + Alt + P (on macOS).
Note
Confirm the rectangular, elliptical and polygonal selection by hitting Enter or by clicking on the viewport outside the selected area.
 Freehand with Lines - Combination of a Polygon and a Freehand selection.
Create freehand selections by drawing an outline around the area you want to select in combination with placing points.
To finish creating a selection with lines either click on the first point again, make a double-click or hit Enter - the last point will be linked
back to the first point automatically.
Activate the freehand selection with lines by tapping Ctrl + Alt + L (on
Windows) / Cmd + Alt + L (on macOS).
Freehand with Lines - Combination of a Polygon and a Freehand selection.
Create freehand selections by drawing an outline around the area you want to select in combination with placing points.
To finish creating a selection with lines either click on the first point again, make a double-click or hit Enter - the last point will be linked
back to the first point automatically.
Activate the freehand selection with lines by tapping Ctrl + Alt + L (on
Windows) / Cmd + Alt + L (on macOS).
 Freehand - Create freehand
selections by drawing an outline around the area you want to select.
When the mouse is released, the end of the line will be automatically
connected to its start. Activate the freehand selection by tapping Ctrl + Alt + F (on
Windows) / Cmd + Alt + F (on macOS).
Freehand - Create freehand
selections by drawing an outline around the area you want to select.
When the mouse is released, the end of the line will be automatically
connected to its start. Activate the freehand selection by tapping Ctrl + Alt + F (on
Windows) / Cmd + Alt + F (on macOS).
 Magic Wand - Create selections based
on the tone and color of the pixels. Activate the Magic Wand selection by tapping Ctrl + Alt + W (on
Windows) / Cmd + Alt + W (on macOS).
Magic Wand - Create selections based
on the tone and color of the pixels. Activate the Magic Wand selection by tapping Ctrl + Alt + W (on
Windows) / Cmd + Alt + W (on macOS).
You can specify any of the following:
- Tolerance - Determines the color range of selected pixels. Enter a value in pixels, ranging from 0 to 255. Value 0 means that only the pixels that are the same color as the specific pixel you clicked on will be selected. A value larger than 0 represents the shades of pixels darker and lighter that will be selected as well.
- Contiguous - Selects only adjacent areas using the same colors. Otherwise, all pixels in the entire image using the same colors are selected.
- Use Alpha - Determines the alpha channel of selected pixels.
There are three modes of how a new selection can be added to any current selection on the canvas:
 New Selection - Replace the current
selection with the new one.
New Selection - Replace the current
selection with the new one.
 Add to Selection - Add a new
selection to the current selection to create a new result. (shortcut: Shift)
Add to Selection - Add a new
selection to the current selection to create a new result. (shortcut: Shift)
 Subtract from Selection - Subtract
the area of the new selection from the current selection to create a new
result. (shortcut: Alt)
Subtract from Selection - Subtract
the area of the new selection from the current selection to create a new
result. (shortcut: Alt)
 Invert Selection - Invert the
current selection. You can invert the selection also with
Ctrl + Shift + I (on Windows) / Cmd + Shift + I (on macOS) or via Select
menu > Invert Selection.
Invert Selection - Invert the
current selection. You can invert the selection also with
Ctrl + Shift + I (on Windows) / Cmd + Shift + I (on macOS) or via Select
menu > Invert Selection.
 Select All - Select the content of
the layer. You can 'select all' also with the shortcut Ctrl + A (on Windows)
/ Cmd + A (on macOS) or via Select menu > Select All.
Select All - Select the content of
the layer. You can 'select all' also with the shortcut Ctrl + A (on Windows)
/ Cmd + A (on macOS) or via Select menu > Select All.
 Deselect All - Deselect the current
selection from the canvas. You can 'deselect all' also with the shortcut
Ctrl + D (on Windows) / Cmd + D (on macOS) or via Select menu > Deselect All.
Deselect All - Deselect the current
selection from the canvas. You can 'deselect all' also with the shortcut
Ctrl + D (on Windows) / Cmd + D (on macOS) or via Select menu > Deselect All.
Quick Fill - Fill the active selection with the currently selected color without switching to the Fill tool. Change color interactively. Use it to quickly block in shapes, create solid-color areas, or apply a base color to a selected region. (shortcut: Shift+Q)
Opacity - Adjust the opacity of the selection. Quick Fill respects this setting. You can set the opacity also interactively after the selection is filled. (1-100)
Expand/Contract - Expand or contract the active selection by entering a value or adjusting it interactively by clicking and dragging in the value field. (-100 - 100)
Feather - Create gradual transitions between selected and unselected areas, providing a soft and natural blending effect. Enter a value or adjust interactively by clicking and dragging in the value field. (0-100)
Roughness - Create more organic selection edges that respect the paper texture and impasto structure, helping edits blend naturally into the artwork. Enter a value or adjust interactively by clicking and dragging in the value field. (0-100)
Video tutorial
Learn more about Rebelle's Selection tool in this video: Selection Tool, Transform Tool.
More information about how to use selections in Rebelle can be found in the Working with Selections section.