

Carles Carbonell, a Spanish illustrator and digital artist, provides a beginner-friendly tutorial on how to use the Perspective tool in Rebelle 7. Whether you work with lines or circles or paint a building, street, or city, here are a few helpful tips.
Perspective is a set of rules created by us, humans, to represent 3D objects on a 2D artwork. We use them to apply volume and distance to objects. The two main perspective techniques used on artworks are the Vanishing Points and Atmospheric Perspective.
This tutorial focuses on using Vanishing Points to draw objects. I will also make a brief introduction to Atmospheric Perspective. Finally, I will do a practice drawing, to showcase the workflow.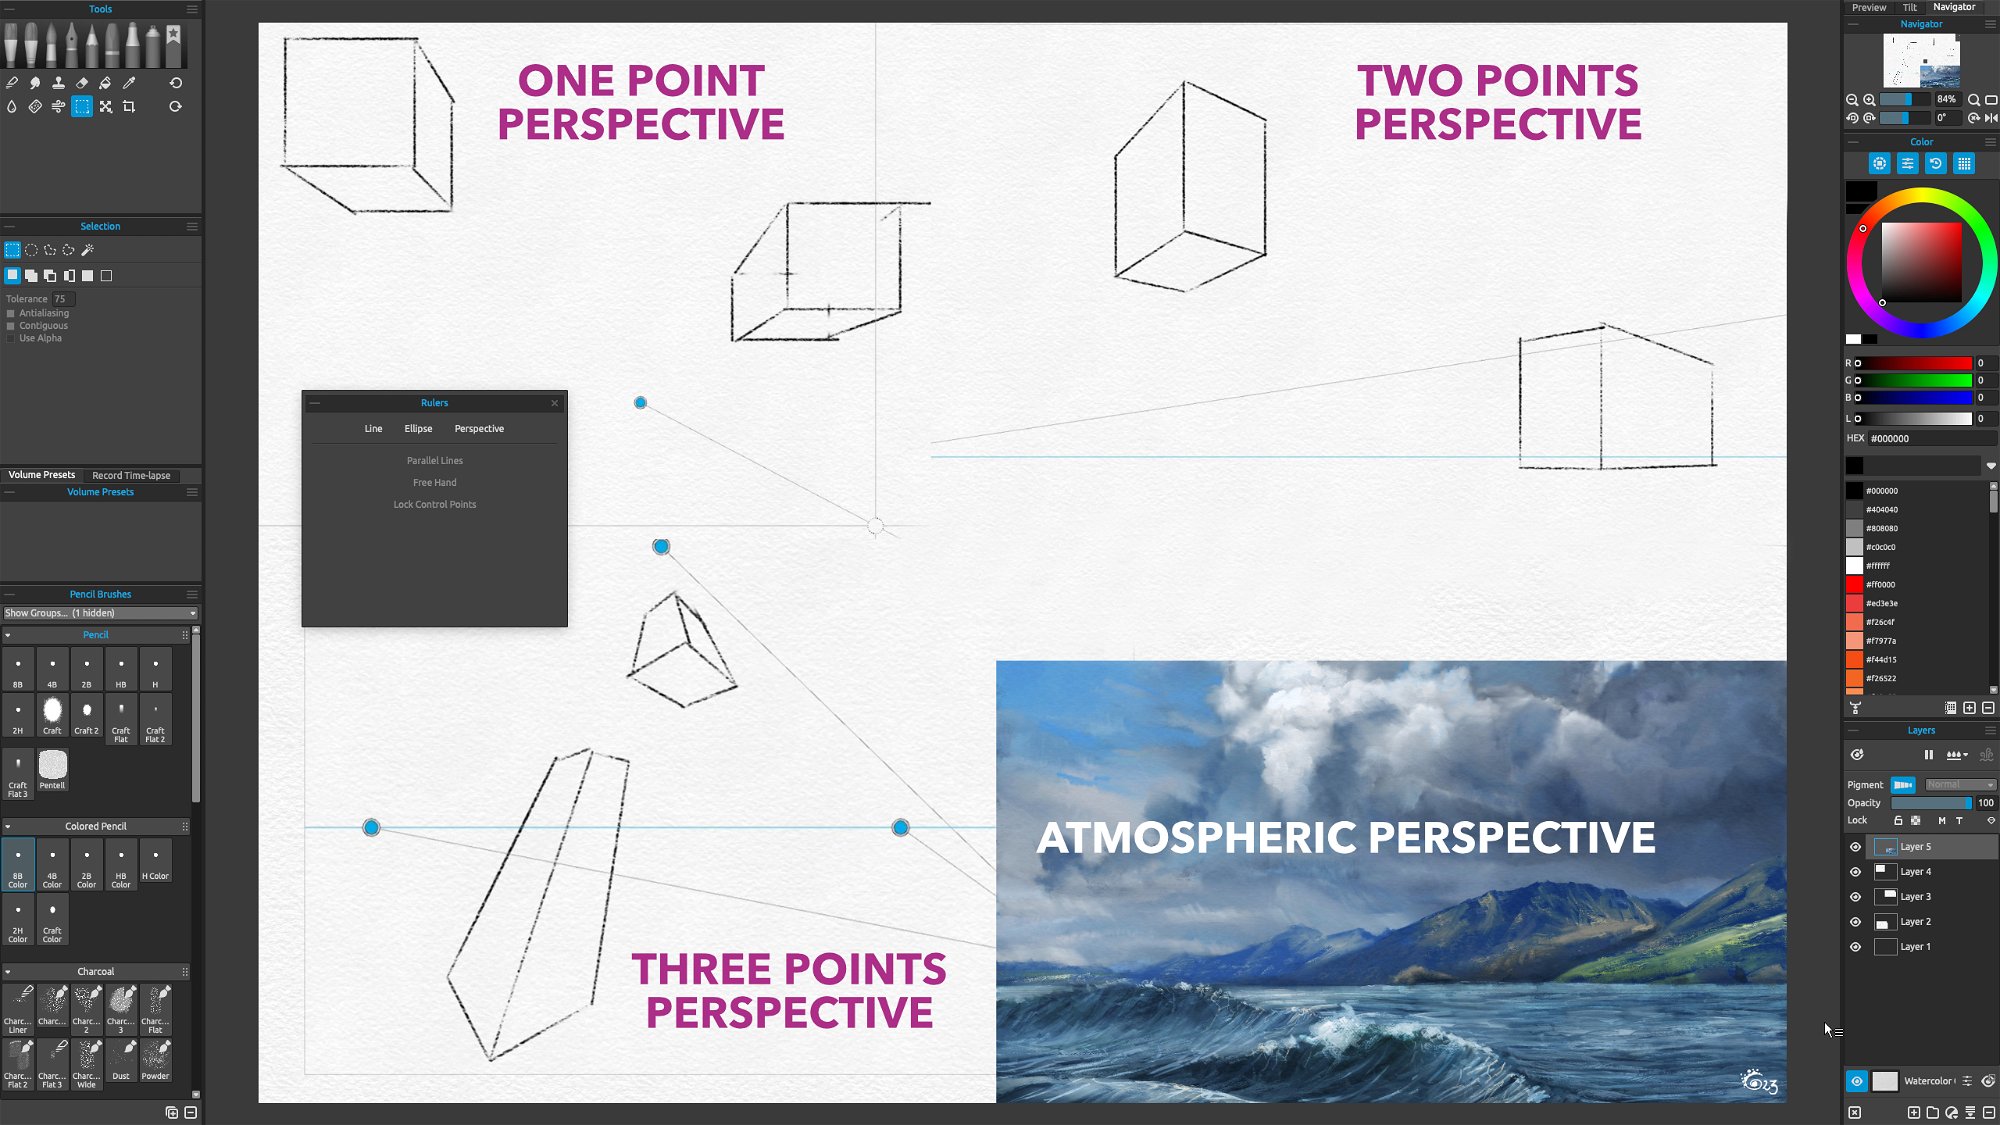
The Simplest Way to Draw Straight Line
A simple and easy way to draw a straight line in Rebelle is to hold the Shift key. This shortcut is set by default and can be changed in Edit > Preferences > Keyboard.
Once you release the Shift key, the temporal ruler disappears, and you will draw freehand strokes again.
Perspective Options in Rebelle
Rebelle also offers complex perspective options. You may be familiar with two panels from previous Rebelle versions however, Rebelle 7 unites rulers and perspective under one Rulers tool.
The Rulers panel can be opened through the Window menu or a shortcut “Shift+R”. Choose whether to draw simple lines, ellipses, or one, two, or three points perspective. You can assign a custom shortcut for all the tools in the Rulers panel (Line, Ellipse, Perspective) through the main menu: Edit > Keyboard Shortcuts > Edit.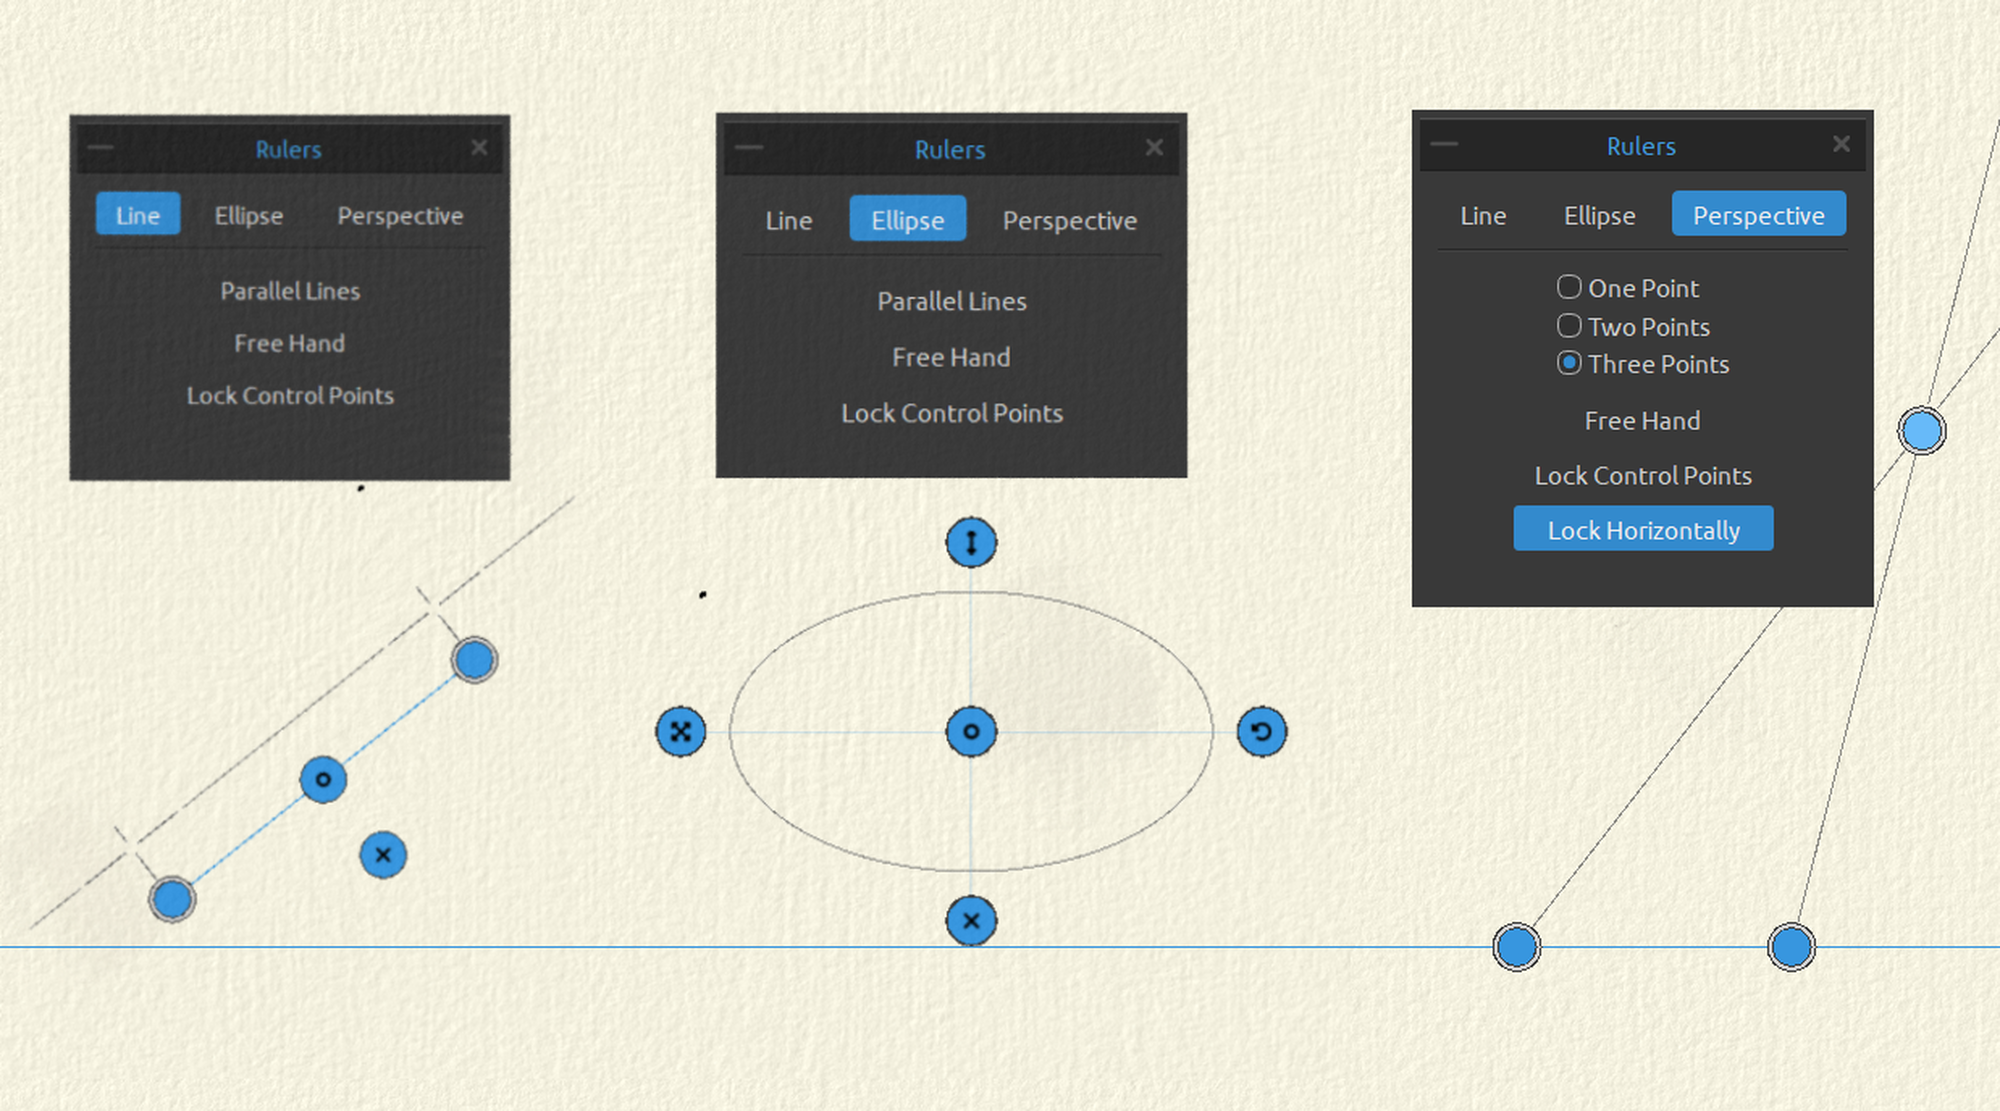 Surely, if you play around with this tool a bit, you will figure out its features quickly. If you need some guidance, watch this tutorial on YouTube with practical examples.
Practical Examples of Perspective in Drawing
Since we already established how to use Rulers, particularly perspective, we can move to practical application. The first step is to decide how many points you want to use. Usually, you will use one or two points of perspective. You can also combine both methods. On the other hand, the three points Perspective needs to be used alone, otherwise the outcome will look unrealistic.
If you want to draw a single building, the best is a one point perspective. If this building isn’t the main subject of the artwork, it’s best to use a two points perspective.
If you draw a city street, it’s best to use one point perspective, because all buildings are perfectly aligned and have the same angle.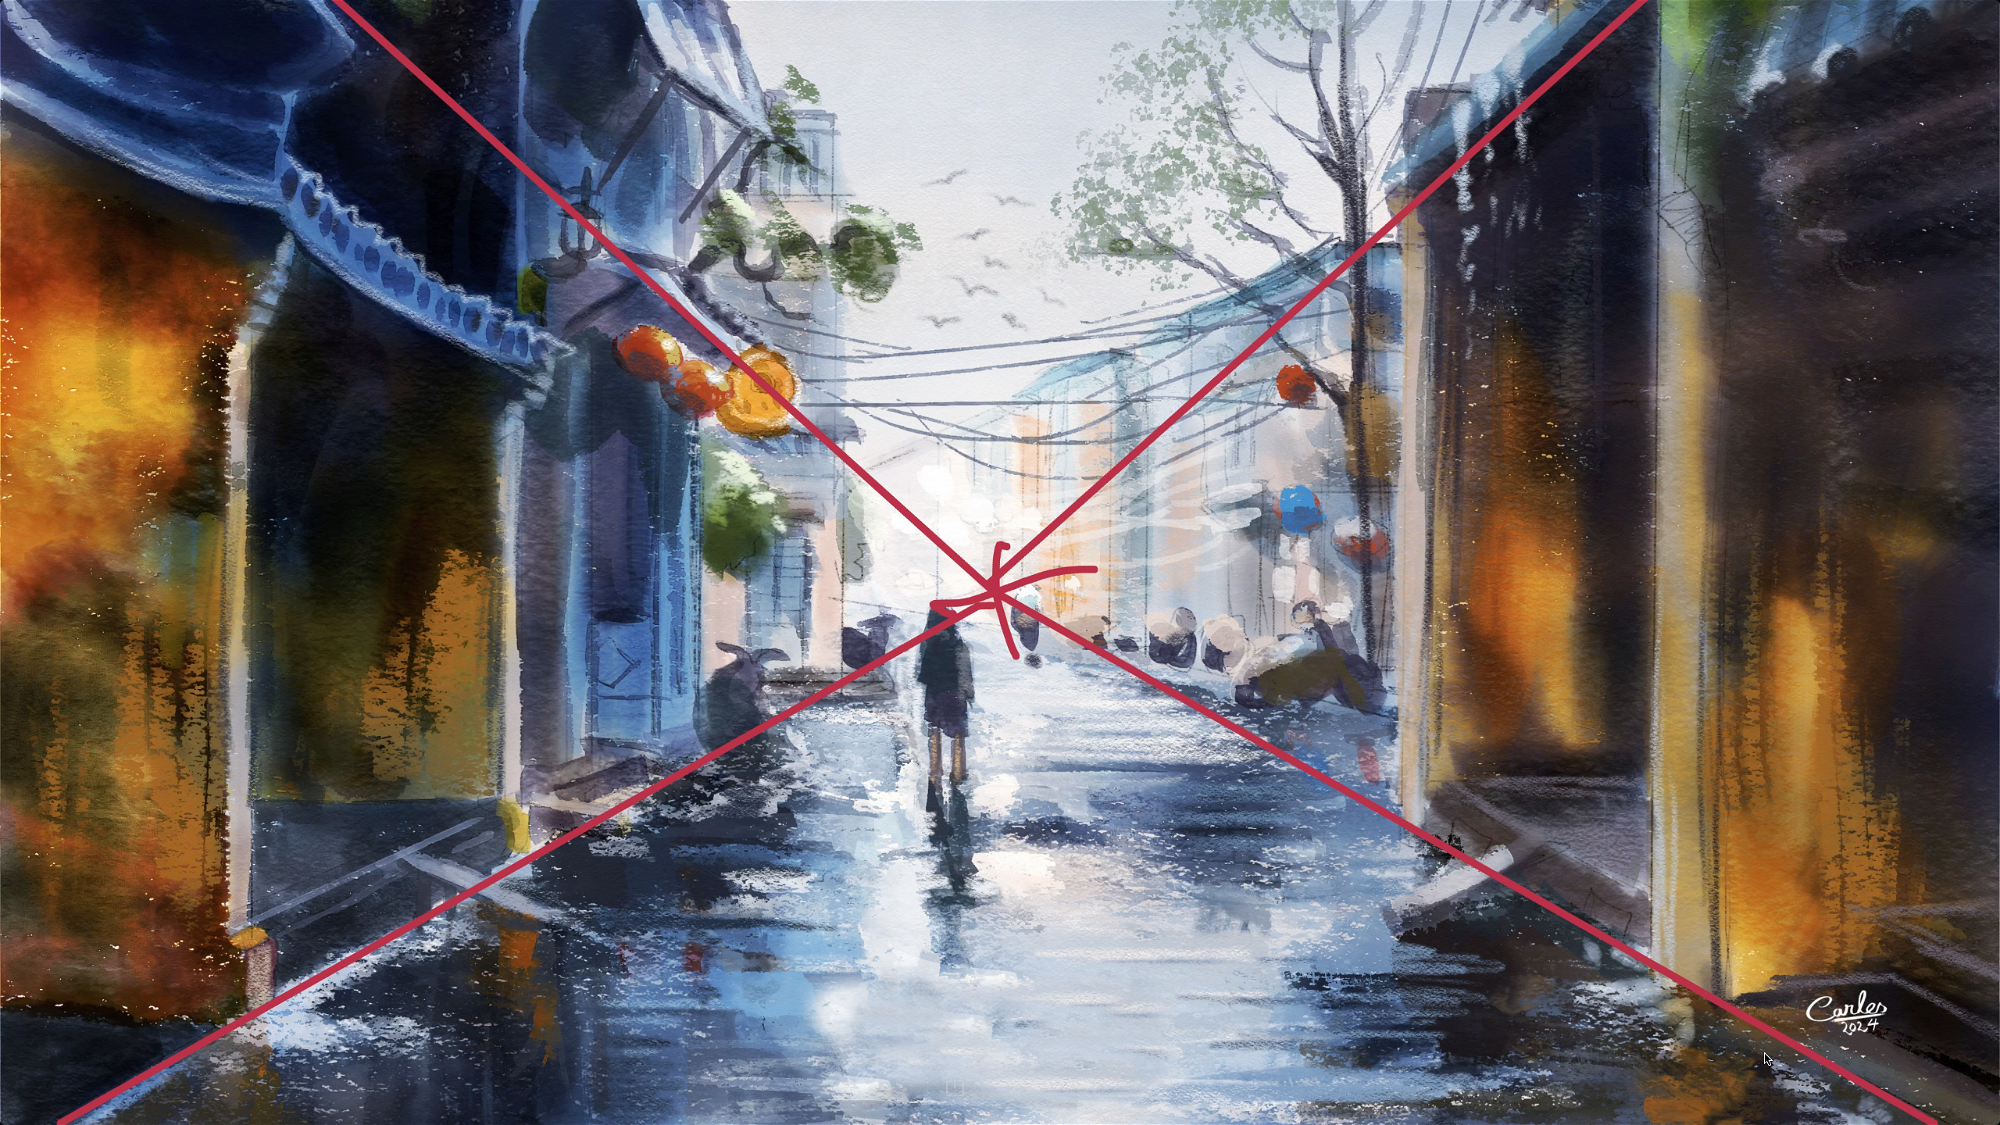 Example of one point perspective
If you draw many buildings with different angles, you will need to use two points perspective. You may need to change the vanishing point location for each building. You may even combine one and two points here.
As said before, the three points perspective must be used alone, never combined with one or two points. You may change the two vanishing points on the horizon line, to change the angle of the buildings. But the vertical point should not be touched. The three points perspective is also good when trying to add drama to the artwork.
Foreshortening
Foreshortening consists of shrinking the size of distant objects and making the near objects bigger. This will make the perspective more pronounced. For example, when we look at a human figure from the bottom, the feet will look much bigger than the head, compared to when we look at it from a frontal view.
You can use one, two, or three points perspective to add foreshortening. However, if you use a very near-object perspective or again, you want to add a more dramatic effect, use three points.
Atmospheric Perspective
Atmospheric Perspective, also called Aerial Perspective focuses on the right color selection when painting landscapes. We need to choose different colors depending on the distance of the object. There are different techniques and rules when painting Atmospheric Perspective. You can use any of these techniques, or all of them at the same time.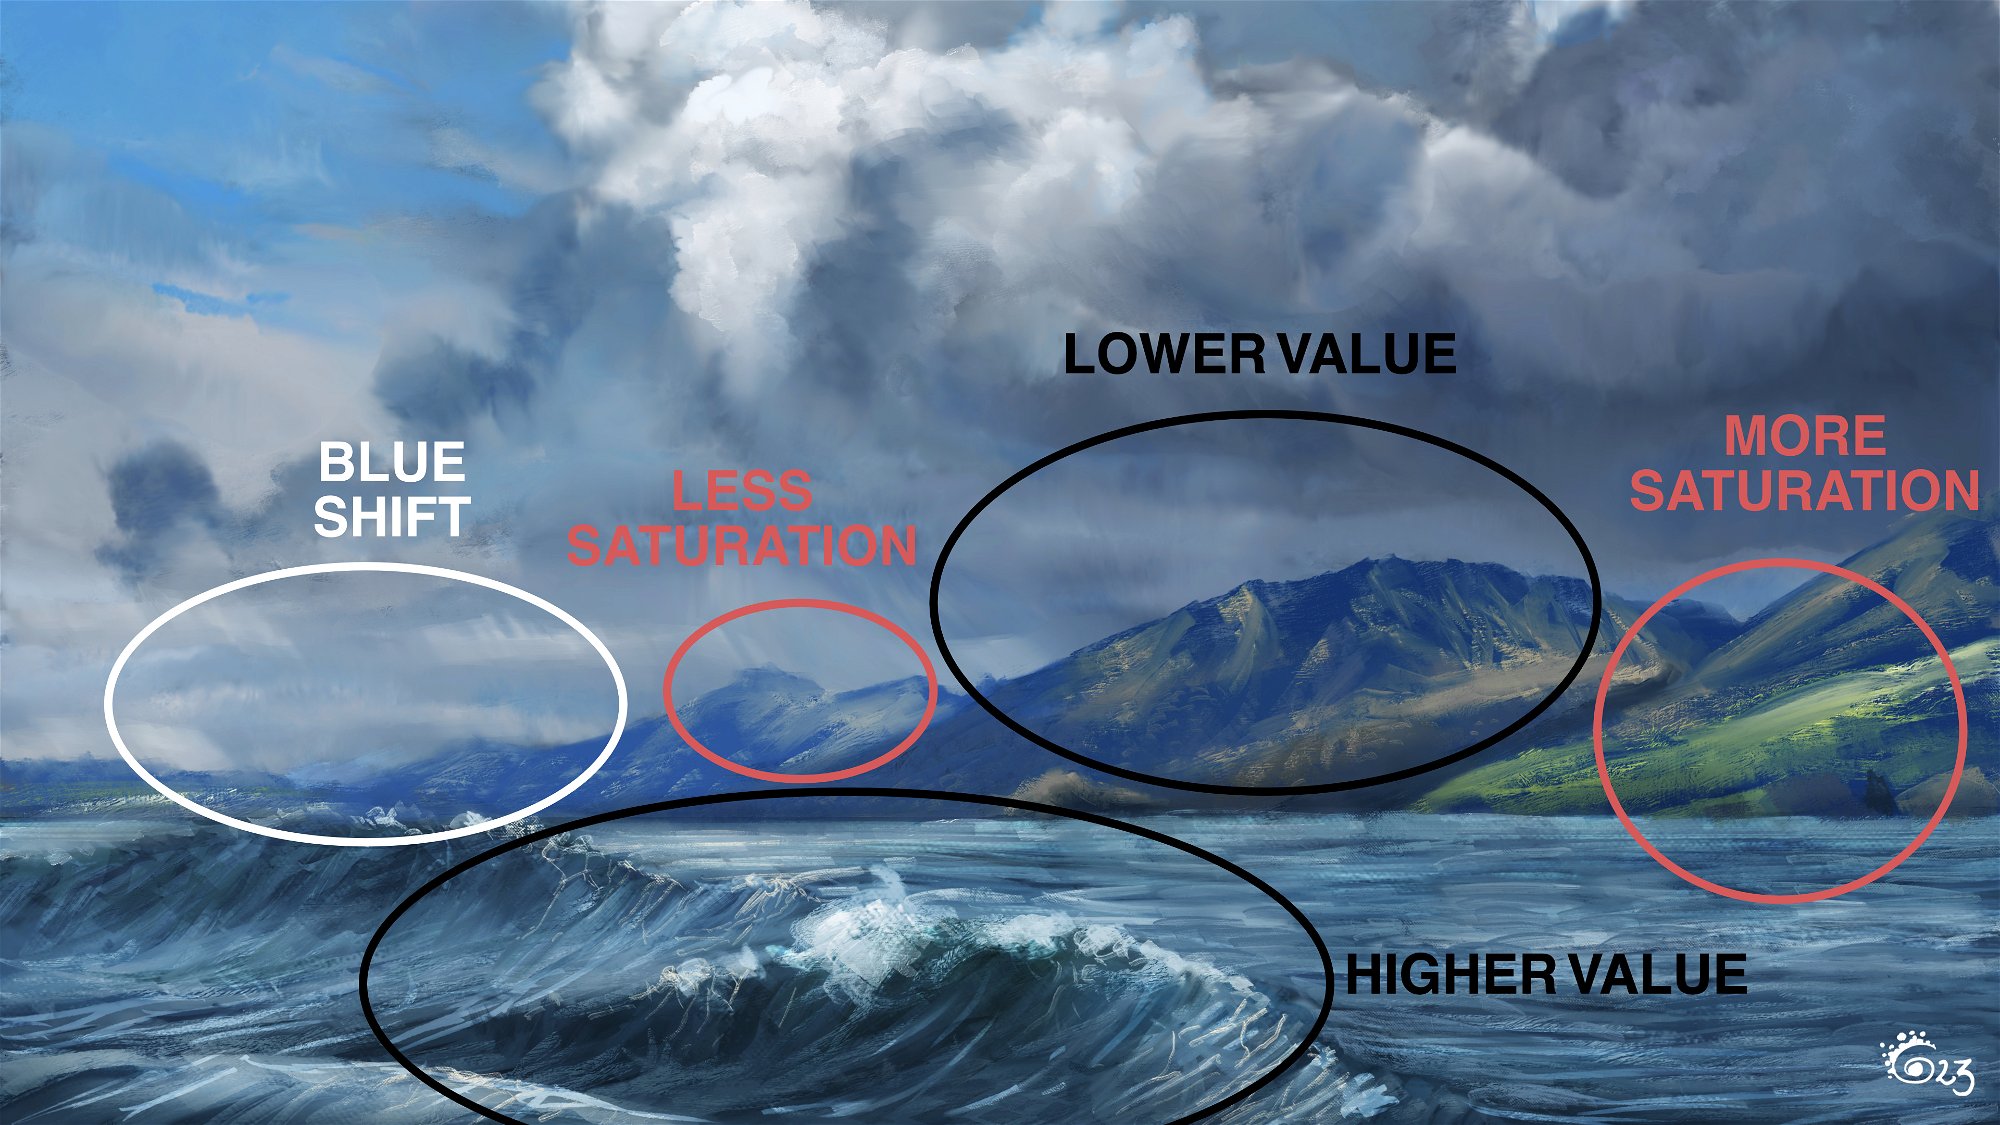 First, we use different values depending on the distance. The nearest objects have a higher value. The distant objects have a lower value. This helps to make more relevant the foreground objects.
Another technique is to use more saturation on the nearest objects. We make this to add contrast between different objects, enhancing the feel of distance.
The last technique is to use a blue colorization. The farther the object, the more blue will be. This is based on real-world physics, it’s due to the reflection of the sky over the objects, more visible on distant objects.
There are more techniques to add the feel of distance. For example, making the near objects warmer and the distant objects colder. We can also lower the contrast of distant objects, or make them brighter. The last technique is to apply less details on distant objects.
You can use all of these techniques, but the first three are the most common when painting Atmospheric Perspective, especially the blue colorization on distant objects.
Let’s Practice Together
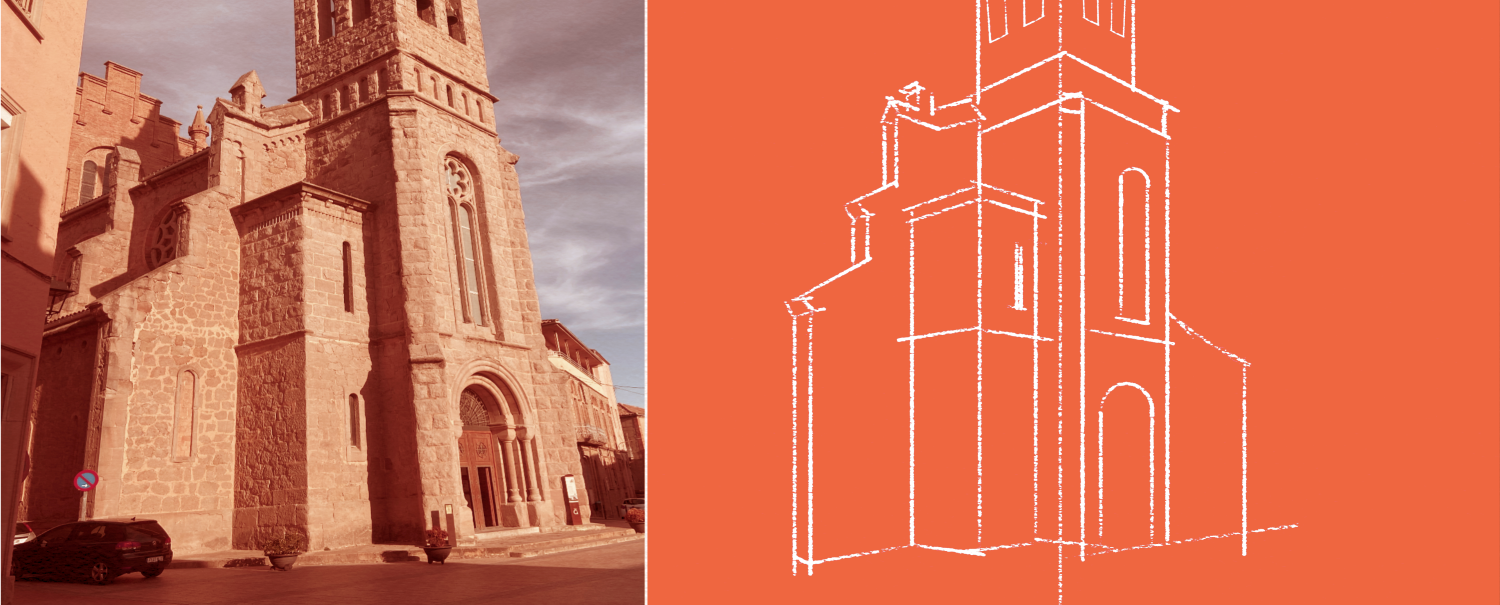
Now is the time to practice all we learned so far. You can use any reference you wish. I will use a photo of a church I took. 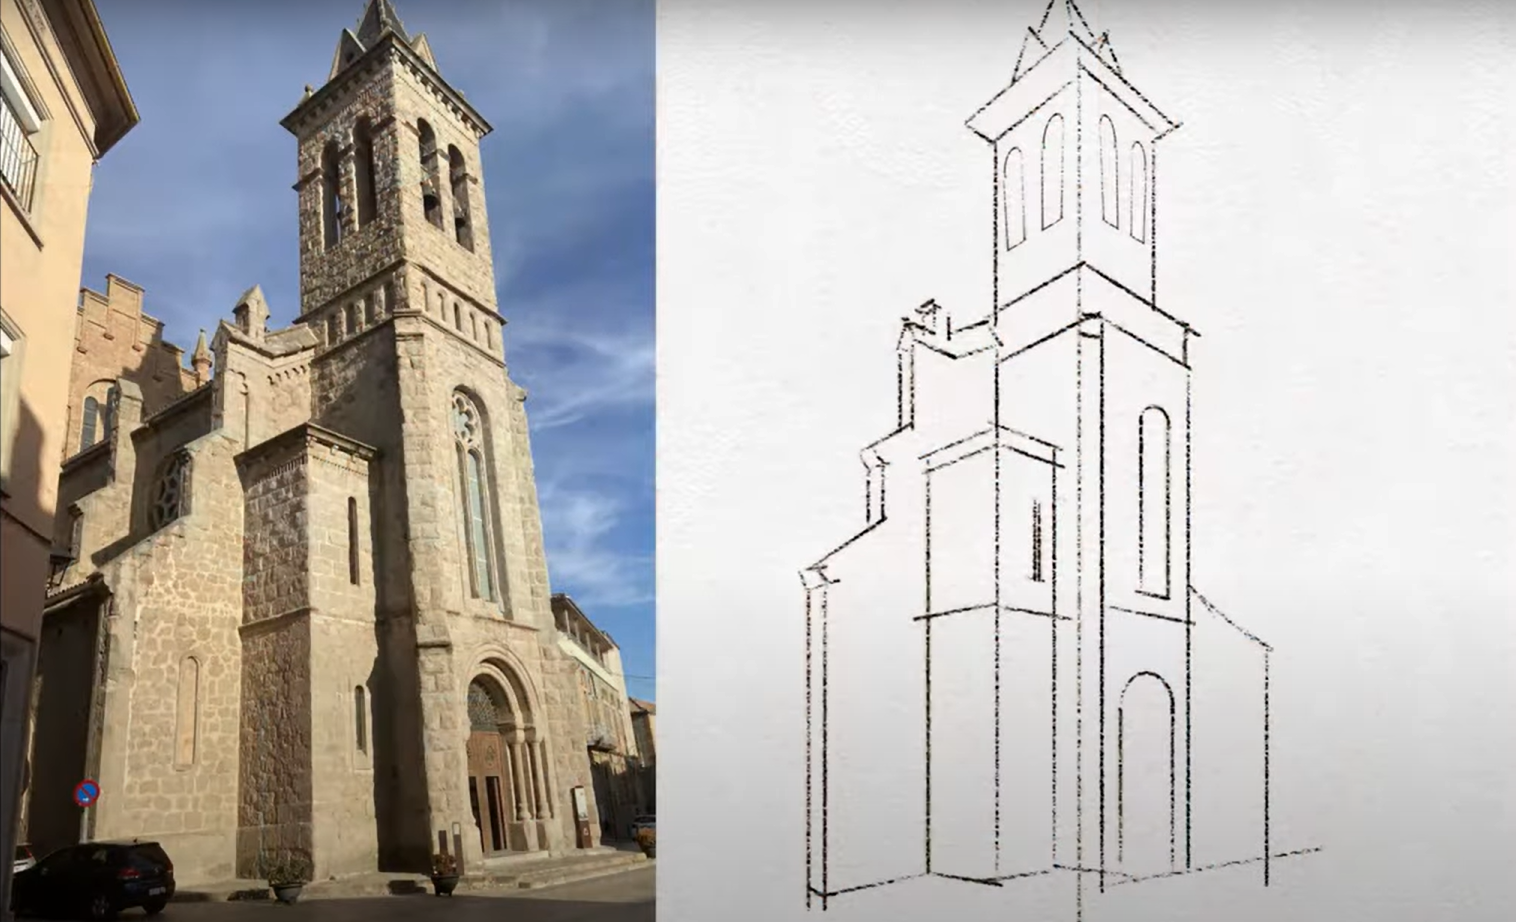 The photo has three points perspective because I used a wide-angle lens. But I will use two points perspective, because, in reality, the focal length of our eyes makes the buildings look more straight at that distance.
Watch this tutorial on YouTube: youtube.com/watch?v=WvG3fcdqKo0
I will trace it to make it easier, as this is just a demonstration. First, I place the two vanishing points in the right location. I start drawing the perspective. The two points perspective is different from the reference, therefore, I have to change the placement of lines a little.
We can use the Ellipse tool to draw the arcs on doors and windows. Press the Shift key to draw quick straight lines out of the perspective setup. I draw some of the windows by using Parallel Lines and the Ellipse Ruler.
I often use the perspective setting of the Transform Tool. This helps to add the right perspective to any two-dimensional drawing. I think this is all there is to teach about Rulers in Rebelle, all there is left is to practice.
____________________________________________________________________________________________________________
Thank you, Carles, for your valuable insights on perspective and Rebelle Rulers' options. We hope these tips will help beginning artists understand how to use perspective in their compositions.
Happy Painting,
Escape Motions Team
-----
Carles Carbonell is a Spanish illustrator, digital artist, and a host at Digital Art Academy. He has been an experienced Rebelle user, for the past couple of years helping to beta test new features. He likes to paint anything and experiment with new techniques with all Rebelle media, especially, creating watercolors and landscapes that tell a story, with curated compositions and rich colors.
Carles’ Rebelle artworks: escapemotions.com/community/user/Carles
For more tutorials from Carles, visit his YouTube channel: youtube.com/@carles_carbonell
What do you think?
0 Responses
0
Upvote
0
Funny
0
Love
0
Surprised
0
Angry
0
Sad
Sign in to comment!
Be the first to comment.