

Digital artwork is amazing. It’s so quick and easy to save and view your work digitally, but one of the reasons for using natural media simulation software like Rebelle is to get that natural look when you finally print your completed work. In this short blog, Rebelle Featured Artist Pete Smith, known as Basement Picasso, shows how features of Rebelle 5 Pro can be used to the best effect to get great prints.

NanoPixel is your friend
If you are aiming to print your next piece when you have finished it is always good to start with that in mind. The first thing to decide is the likely size and scale of the final artwork. I am fortunate to have a trusty old Epson 3880 printer that can print up to A2 and that is generally the scale I am interested in, but of course, you can work to different sizes to suit your printer.
An A2 image is 16.54 inches by 23.39 inches (420 by 594 mm). A good final resolution to print at is 300 PPI (Pixels per inch) which will produce a crisp and detailed image. Lower resolutions will start to become visibly blurred or pixelated if you look closely:_min.png) So if we get the calculator out and multiply 16.54 (inches) by 300 (pixels per inch) we get 4962 pixels. Likewise, 23.39 (inches) * 300 (pixels per inch) = 7017 pixels. I usually use round these numbers to 4960 by 7016 as they are nicely divisible by 2 and 4 which we will see in a minute. Now, if we create an image that is 4960 pixels by 7016 pixels that is certainly a high enough resolution to print at the desired A2 scale, but there are a couple of issues. Firstly, it will take a lot of memory and the performance of larger digital brushes may be slower than expected. Secondly, brushes tend to be sized in pixels, so at this scale, they all will be much smaller and the texture and thickness may seem smaller as a result.
So if we get the calculator out and multiply 16.54 (inches) by 300 (pixels per inch) we get 4962 pixels. Likewise, 23.39 (inches) * 300 (pixels per inch) = 7017 pixels. I usually use round these numbers to 4960 by 7016 as they are nicely divisible by 2 and 4 which we will see in a minute. Now, if we create an image that is 4960 pixels by 7016 pixels that is certainly a high enough resolution to print at the desired A2 scale, but there are a couple of issues. Firstly, it will take a lot of memory and the performance of larger digital brushes may be slower than expected. Secondly, brushes tend to be sized in pixels, so at this scale, they all will be much smaller and the texture and thickness may seem smaller as a result.
Rebelle 5 Pro has an excellent feature to help with this, called NanoPixel export (File > NanoPixel Export...). This allows you to up-scale a lower resolution image and gets really good results thanks to its texture and AI processing. When you have finished the painting you can export using the NanoPixel interface and get a final image that is two, three, or four times the resolution of what you started with.![]()
Notice how the pixel size is getting larger as the % increases.
Start with the end in mind
So what we can do is work backward, starting with our final target resolution (of 4960 by 7016) and dividing it by two, three, or even four to understand the size of the painting that we should begin with. This gives us a little table: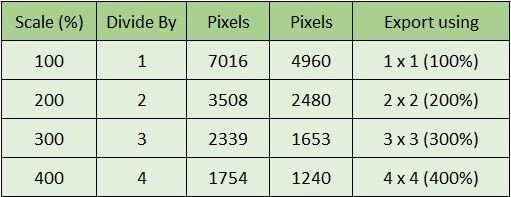
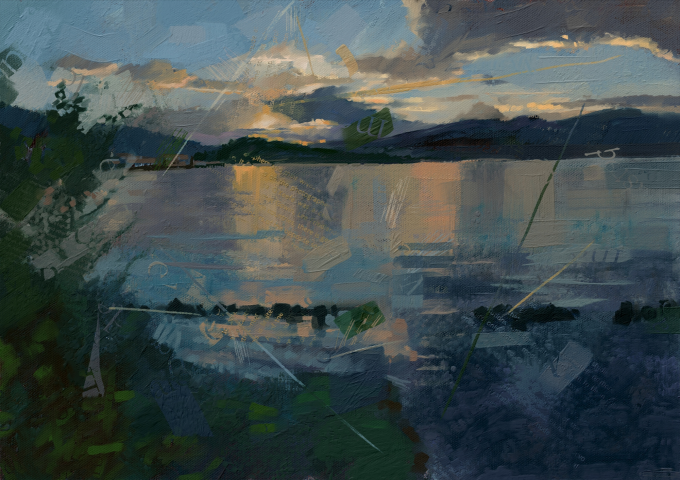
For my example painting, I am going to aim to use four times export at the end so I can use the table to work out my starting canvas size in pixels. This means that I need to start with an image size of 1240 pixels by 1754 pixels. I would do 1754 wide by 1240 high for a landscape image, and 1240 wide by 1754 high for a portrait image. If you create your image at 300DPI – it will seem small to begin with (5.85 by 4.13 inches), but when you scale up at export you will see the expected size both in terms of pixels (7016 by 4960) and canvas size (23.29 by 16.53 inches).
The DPI setting will affect the scale of the canvas. When your image loads – if you find the canvas texture is too big or too small adjust it by selecting the canvas settings (open Select Canvas window). Then adjust the slider up or down as needed:
At this resolution, brushes will be large and create strong texture, work smoothly and quickly and the liquid effects of water running and dripping will flow quickly. The same (700 pixels) brush (the largest size) used on a full-size canvas of 7016 by 4960 would be much smaller and potentially much slower:
In this video, you can see the canvas size being put into practice for a quick landscape painting that is then exported and printed out at an A2 scale. In the video, I also show another quick way to prepare for NanoPixel export by using the DPI scaling.
Once I have finished my quick painting demo and I am happy with it (or as happy as any artist ever is with their final work), I can export it using the NanoPixel export, selecting the 4*4 option. The image that is saved converts the image size from 1240 by 1754 pixels, into 4960 by 7016 pixels, ready for printing.
 I can then print out the image and frame it:
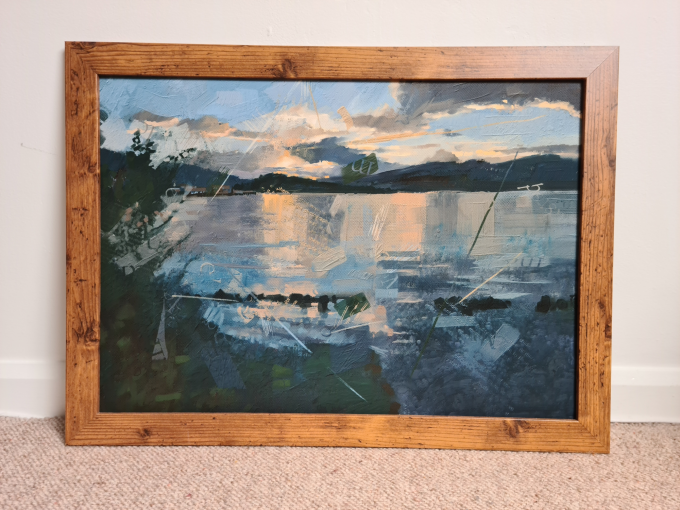 I hope you have enjoyed this short tutorial on how to use NanoPixel export in Rebelle 5 Pro. If you own the Pro edition, make sure to use this technology to the fullest when printing your work.
Happy Printing!
Escape Motions
text and Images provided by Pete Smith
-----
Pete Smith started his journey in art in the ’90s as a self-taught Comic Colorist, working in traditional acrylics, inks, and airbrushes. An increasing interest in Fine Art led to many years of study and development of interest in traditional materials, oil painting, and life drawing. For the last 10 years, Pete has been blending his interests in art and technology to combine traditional techniques with new digital technology on a quest to find the ultimate digital toolset to provide a traditional drawing and painting experience.
Rebelle Featured Artist profile: www.escapemotions.com/featured-artists/peter-smith
Website: www.basement-picasso.com
YouTube channel: www.youtube.com/user/basementPete
Instagram: www.instagram.com/basement_picasso
What do you think?
0 Responses
0
Upvote
0
Funny
0
Love
0
Surprised
0
Angry
0
Sad
Sign in to comment!
Be the first to comment.