

Rebelle provides digital artists with several options for customization. This digital painting software can be adjusted to meet your requirements for seamless work so that you get the most out of it during your creative process. It does not apply to the user interface only, but also to brushes, language, shortcuts, and more. In today's blog, we'll take a look at what customization possibilities Rebelle offers.
Create your own workspace
It is so easy to create your custom workspace in Rebelle. All you have to do is rearrange panels according to your liking and get to work! All panels can be docked in or out of the interface so the re-arrangement is swift and easy. If you’ve just been using the standard workspace, this simple how-to will give ideas on how to make your Rebelle workspace truly your own:
- Panel layout
Keep the panels close by that you use the most. Simply click and drag any panel by the name tab and move it to a different place of the user interface. Rebelle will give you hints on where to drop it by highlighting the possible placement.
Remember, you can move and dock most of the panels to the left or right side of the interface. You can also dock the Tools, Properties, Brushes and Navigator panels at the top or bottom of the user interface. Enable this option in Preferences > General > Interface.
You can collapse a panel or panels to gain more space within the interface, or merge panels together. To close the panels, click the close button present in the top right corner of the panel or open the panel menu and select "Close".
Depending on how you like to use the program, you can work with "free-floating" panels which will automatically hide when you paint behind them.
Easily adjust the width and height of the panels by dragging the panel to the sides until you are satisfied with its size.
- Tools panel customization
The Tools panel can be customized specifically for your needs - you can set it to a vertical or horizontal position or keep it in its default state:
A) Vertical position
B) Default position
C) Horizontal position docked at the top of the user interface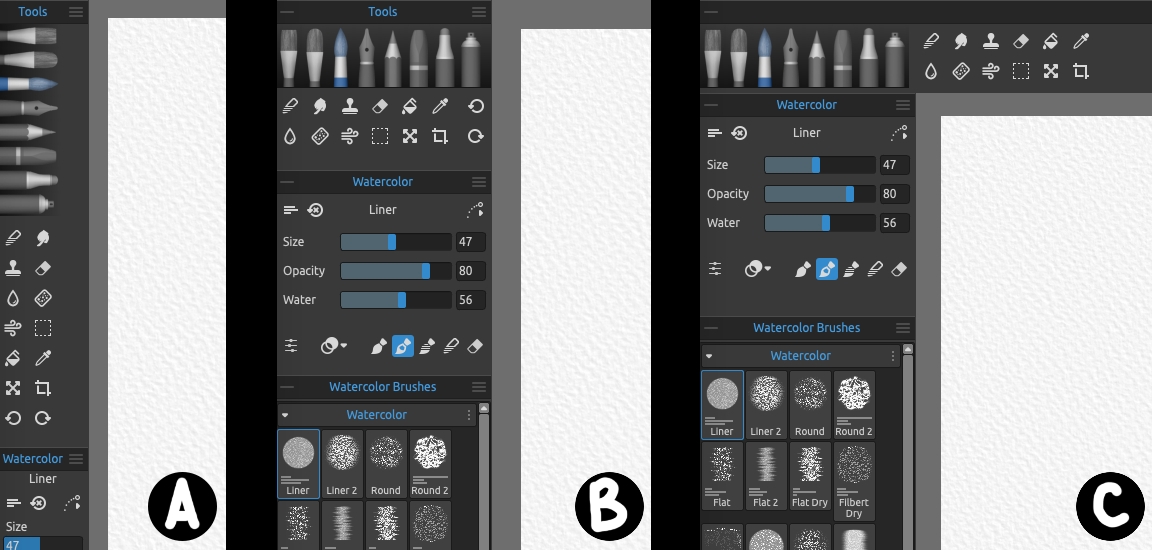
By default, the Tools panel is on the left side of the screen. There’s no rule about keeping it there - no reason not to switch its placement if you’re left-handed.
- Saving your custom workspace
When you are satisfied with your workspace, save it as a custom layout. To do this, go to the Window menu > Export Layout, name your custom workspace whatever suits you, and hit "Save" in the dialog window. You can save multiple layouts from Rebelle, based on what work you are doing in the software (painting, editing, etc.).
- Opening your previously saved workspace
Rebelle remembers the previously opened workspace layout upon reopening of the software but if you accidentally made any changes and would like to get your custom layout back, just go to the Window menu and select Import Layout. Select which layout you would like to load and click the "OK" button. Your custom layout will load.
- Hide panels | Lock panels | Reset layout to default
To have a quick overview of the canvas without the interfering panels, you can hide them by going to the Window menu > Show panels or by hitting the "Tab" shortcut.
Lock the panels' position and prevent them from any accidental changes via the Window menu > Lock panels.
If you would like to go back to the default layout, you can reset the current layout to default via the Window menu. You will need to restart Rebelle to load the default user interface.
Customize brush icon
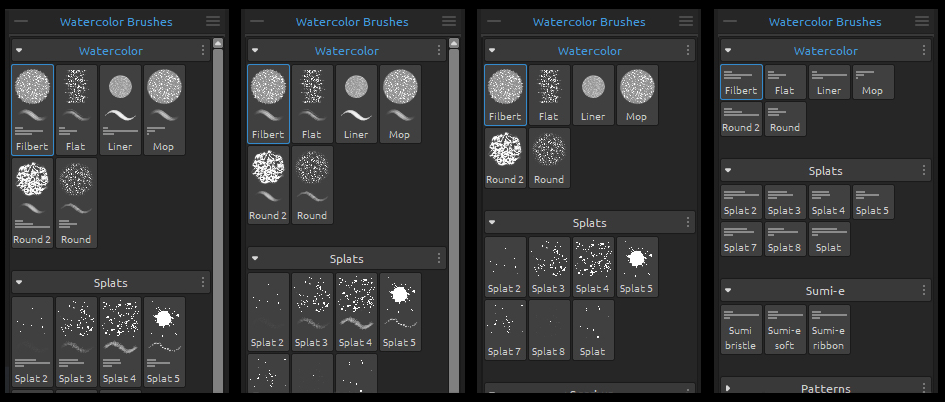
The Brush Panel can be set to show just the names of brushes, or it can show icons that include visual representations of each brush’s saved properties. For instance, icons can show a brush’s shape, its stroke, and its saved volumes. Volumes appear as horizontal lines under the icon representing the brush’s volume sliders. To change the way brush icons are represented, choose the desired options under the Brushes panel menu > Icon.
Select language
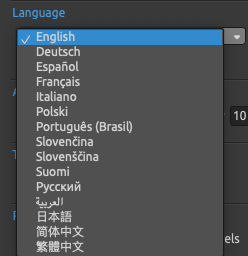
Rebelle offers language localization of the user interface. When you run Rebelle for the first time you can select from the list of languages. If you keep the default language which is English and you would like to change it later during working in the software, just go to the Help menu > Language or Preferences > General > Language and choose your preferred localization. These are the languages you can currently choose from:
To load the selected language, you will need to restart Rebelle.
Add custom canvas size | Favorite presets
You can easily create your custom canvas size in the New artwork window accessible via the File menu. It is also possible to save the custom size presets to either the Print or Screen tabs according to the specification of the canvas size.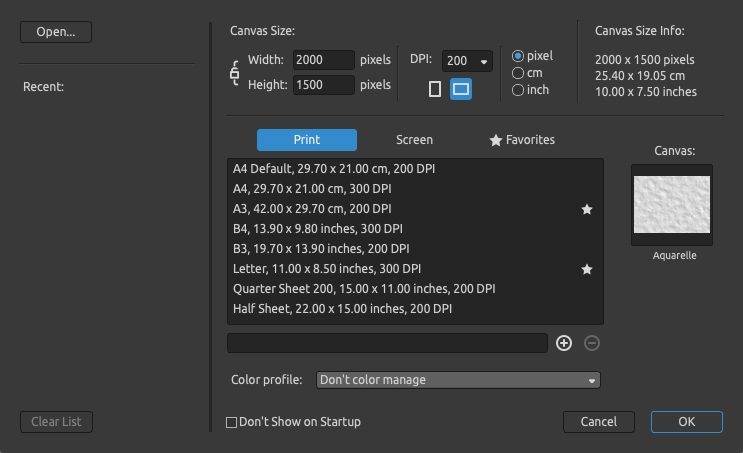
There may be sizes you use more often than the others. If you have a large list of canvas sizes saved, it is easy to get lost. Mark the canvases you used the most with a "star" - these will be added to the list of your Favorites canvas size presets.
Use custom canvas color
Each paper has its default canvas color, but you can change it anytime via the Select Canvas window:
Import custom textures
Rebelle offers a variety of creative papers in the installation and also on our website where they can be purchased as add-ons. You can create your own papers too - the paper can be a PNG file of various sizes with peaks and valleys called the heightmap. When you select a canvas size larger than the proportions of your custom paper, Rebelle will tile the paper accordingly. Here it is important to mention that your paper should be designed to be seamless, so when it is tiled, no seams are visible.
Import your custom papers by adding them via the Import Canvas Texture button in the Select Canvas Window.
Preferences
- Scaling
In Edit > Preferences > General, you adjust some settings to get the best from Rebelle on your computer. If you're on a high-density monitor, set up the Scale so that the user interface controls are easier to read.
- Autosave
The next thing you should customize in Preferences > General is the Autosave feature.Autosave automatically saves your art while you work on it. The default setting is 10 minutes, but you can set it to less or more, according to the speed of your workflow.
- Tooltips
When you position the pointer over most of the tools and options, tooltips will appear by default. Sometimes the tooltips are unnecessary, and you wish to hide them - you can do so by disabling the "Show tooltips" option. This option can be found in Preferences > General.
- Cursor
Customize the appearance of the painting cursor for all painting tools and also for Blend, Smudge, Water, and Dry tools via Preferences > Tools. You can select from these options:
- circle
- with direction - this option displays a line in the center of the brush shape that suggests the direction of the brush
- circle with crosshair - this option displays the crosshair in the center of the brush shape
- crosshair - only the crosshair is visible
In Rebelle it is possible to change the size and loading/opacity of the brushes directly on the canvas by holding Ctrl (or Cmd) key while dragging the mouse or stylus to the sides. When you engage this process, the on-screen representation of the brush (the brush pointer) will first appear in its Resize Color. The default color is red, but this can be changed anytime in the Preferences panel > Tools.
- Color of "Show wet" mode
Set a custom color of the Show wet mode via Preferences > Color. When activated in the user interface, the Show wet will create a thin filter layer above all wet parts of your painting. By default, the color is blue but when you use the blue color in your work, the effect might be hardly visible. Therefore, we'd suggest you select your own color in the Preferences.
- Color and opacity of stencils & selections
The default color of the stencils and selection is red. Again, this color may interfere with the underlying red painting color and could be harder to see. In such a case feel free to alter the color and also the opacity of stencils and selection in Preferences > Color.
There are even more settings to customize in the Preferences - check them out!
Customize shortcuts
For those who prefer the ease and speed of keyboard shortcuts, Rebelle offers plenty of customizable shortcuts in the Preferences. Access them directly via the Edit menu. You can assign shortcuts to almost everything in the UI, including the tools, filters, color corrections, layers, and more. You can edit, delete, or add to the Rebelle's default settings or create your own custom set.
In the Shortcuts section find the tool for which you would like to modify the shortcut. Then type a new shortcut. If the keyboard shortcut is already assigned to another command or tool you will see an alert. In such a case you'd need to remove the shortcut for that tool to set it to the current one.
It is also possible to add more keyboard shortcuts to one tool - just click the [ + ] button at the bottom. To reset all shortcuts, use the Preferences menu > Reset All: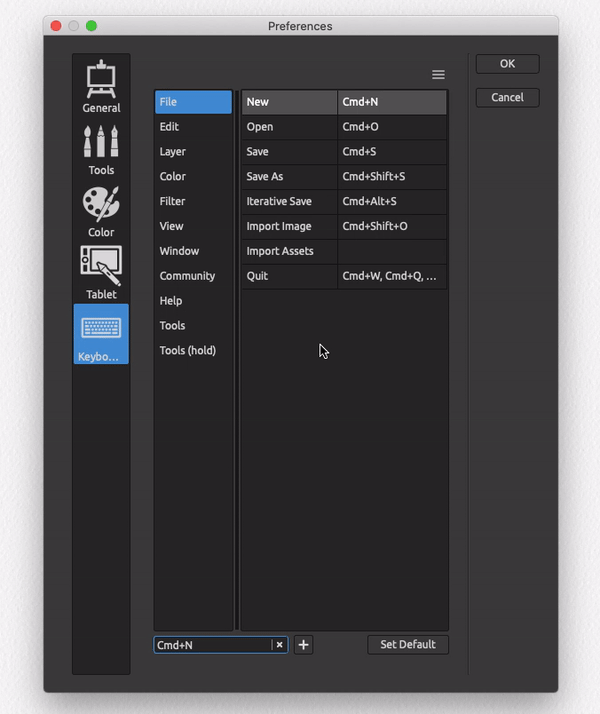
If you would like to reset only the currently selected shortcut, use the "Set Default" button at the bottom.
It is highly recommended you save your custom keyboard shortcuts via the Keyboard Shortcuts menu > Export Shortcuts. An .xml file will be created and can be imported anytime via the same panel menu. This option is especially handy when you use Rebelle on more of your personal computers and do not need to set the same shortcuts on all your machines.
What do you think?
0 Responses
0
Upvote
0
Funny
0
Love
0
Surprised
0
Angry
0
Sad
Sign in to comment!
Be the first to comment.