

We are thrilled to introduce a new tutorial series for beginning or intermediate artists, called Rebelle Art School with Daniel Ibanez. In this series, we will look at the fundamental principles of traditional drawing and transform them into a digital painting environment. Let´s kick off this series with a Contour Line Drawing.
If you’ve ever felt like contour line drawing is the opposite of your style, rigid, technical, not “you”, you’re not alone. A lot of artists feel exactly the same way. But here’s the truth: learning contour line drawing is like tuning your creative instrument. It connects your eye and hand in a way that can transform the way you see, draw, and paint. And the best part? It’s actually really fun once you surrender to the process.
Grab your pencil, open your sketchbook (or your favorite painting app), and let’s dive into the art of seeing through contour.
What Is Contour Line Drawing?
At its core, contour line drawing is about getting your eye and hand to work together. Imagine it to be like synchronized swimmers.
As your eye traces the edges of an object, your hand follows along, recording that journey as a continuous line. The idea isn’t to make a perfect picture, it’s to build a sensitive connection between what you see and what you draw.
Think of it this way:
Your eye observes, your hand translates, your mind takes a back seat. It’s drawing without judgment. Just observation, motion, and feeling the edges of the world.
Step One: Blind Contour Sketching (Warm Up)
Let’s start with what’s called a blind contour drawing. It’s one of the most humbling and surprisingly freeing exercises you can do.
Pick something simple, like a pear or a flower. Focus your gaze entirely on the subject. Once your pencil touches the paper, don’t look down again. You’ll want to peek, but resist it. Just trace the edges with your eyes and let your hand follow. Go slowly, painfully slowly if you can. Every wrinkle, every curve, every dip matters.
When you finally look down, your drawing will probably look hilarious. Lines might shoot off in weird directions, proportions will be off, but that’s okay. The goal isn’t perfection. It’s awareness.
Blind contour drawing teaches you to see before you think. It quiets the inner critic and sharpens your observation like nothing else. Repeat it with a few more references.
Step Two: Controlled Contour with a Little Peek
Once you’ve done a few blind contours, it’s time to loosen up the rules.
This next version still relies on that eye-hand connection, but you’re allowed to peek at your paper now and then. The rule is simple: you can look at your drawing, but you only draw while you’re looking at your subject. This method gives you a bit more control and helps you begin to shape compositions while keeping that same mindful flow. You’ll start noticing the rhythm in your lines, they’ll feel more confident, more expressive, and more alive.
Try this one with a flower. Zoom in on the petals and slowly let your pencil wander across the edges. You’ll feel your eye and hand syncing up again, finding that meditative pace where observation takes over.
Step Three: Turning Contour into Art
Now that you’ve practiced, let’s take contour drawing from an exercise to an artwork.
Pick one of your favorite contour sketches, maybe the flower or the pear, and clean up the lines a bit. Preserve their spontaneity but add some intention. Vary the pressure of your pencil or stylus to create rhythm in the line weight.
Then, on a new layer, add a wash of watercolor or light color behind the drawing. Don’t overwork it! Let the paint stay translucent so your lines shine through. This is where contour line drawing transforms from “warm-up” to “wow.” The soft color contrasts beautifully with the delicate linear structure. Try using complementary hues, a red line over a green wash, or a blue line work over orange tones, to create visual pop.
Step Four: Bringing Contour into Your Painting Workflow
Here’s where things get really interesting. Once you understand contour, you can start integrating it into any painting style. Even full-color, value-based pieces.
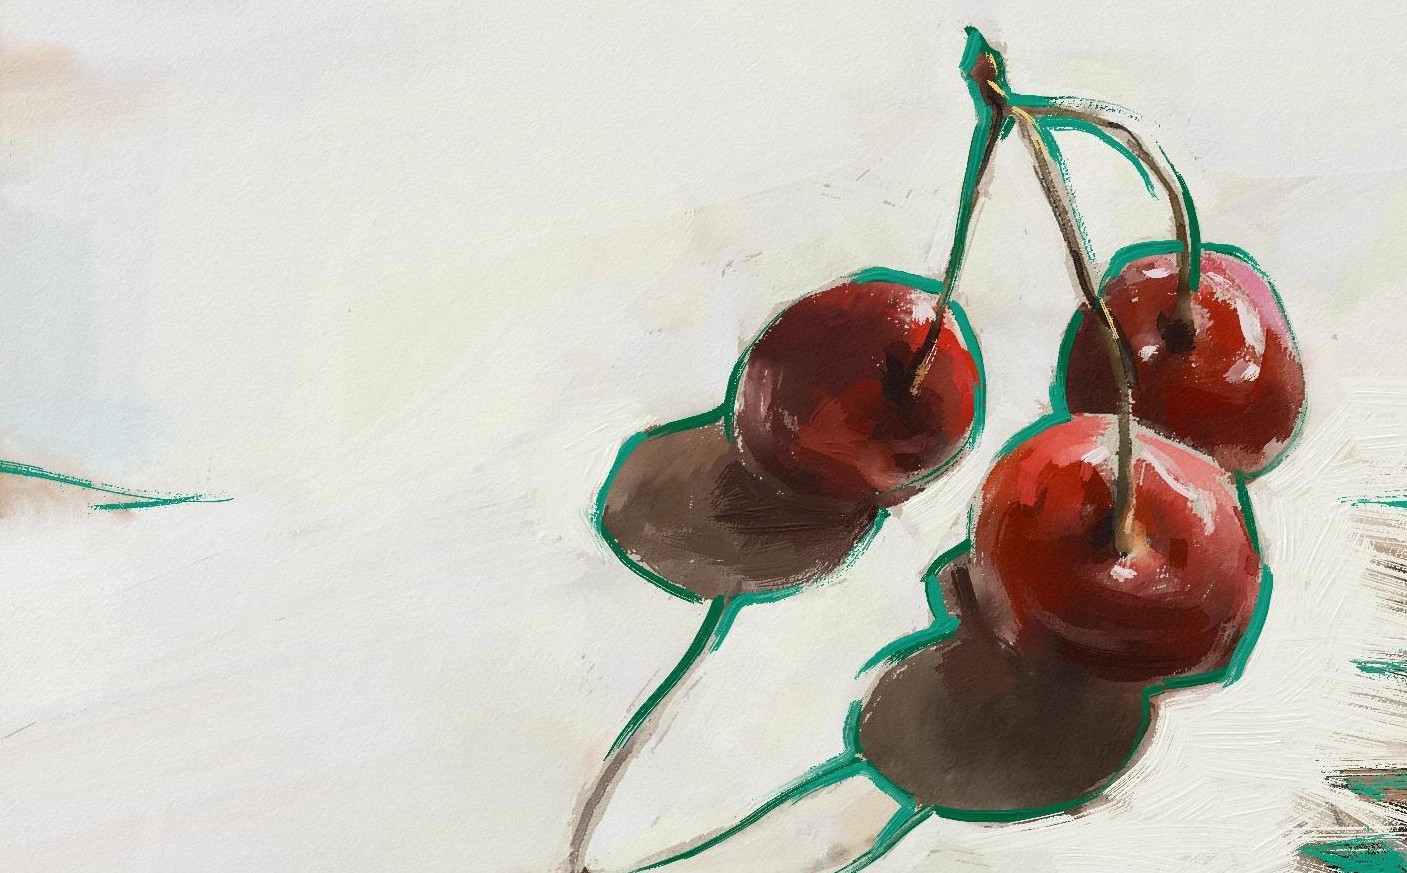
Start with your usual painting approach. Block in your darks, midtones, and highlights. Keep it loose, let watercolors diffuse naturally or oils blend smoothly. Then, once your color is in place, add contour lines on top. Try outlining with a complementary or slightly darker hue than the area beneath it. The contrast will add energy and structure to the painting. It’s a great way to bridge realism and design, creating a more expressive, stylized piece.
For example, a simple fruit study painted in muted oranges and yellows can come alive with crisp violet contour lines over top. It’s graphic and elegant, a perfect blend of observation and creativity.
Step Five: Figures and Scenes
Once you’ve mastered still life subjects, experiment with something more complex. Maybe a figure or a street scene.
Use contour to capture the gesture and movement of the subject. You’ll be amazed at how much emotion and rhythm you can communicate with just a few sensitive lines. Don’t worry about accuracy; contour is about feeling the form, not measuring it. Keep your eye on the subject most of the time. The less you “plan,” the more organic the result.
Why Contour Line Practice Matters
Contour line drawing is a practice in patience and perception. It trains your brain to see before it labels. It helps you slow down enough to notice the subtle transitions, the way edges turn into shadows, the way light defines shape.
You’ll find that after a few sessions, all of your drawings feel sharper, more alive. You’ll spend more time looking at your subject than your page, and that’s when real growth happens.
Homework: Your First Contour Studies
Let’s make it official. For this lesson, here’s your Rebelle Art School homework:
- Blind contour a pear (or any piece of fruit).
- Controlled contour of a flower.
- Create one finished piece that combines contour and color, either with watercolor or digital tools.
And when you’re done, post them in the Escape Motions forum. No judgment here, just curiosity, laughter, and learning. Even professional artists get wobbly lines in contour exercises. That’s part of the beauty of it.
If you would like to use the same reference as Daniel Ibanez did for this tutorial, download it from here.
Final Thoughts from Daniel Ibanez
"I’ve been drawing and painting professionally for years, and I still return to contour line exercises. Not because I love doing them (honestly, they’re humbling), but because they make me better every time.
Contour drawing isn’t about perfection. It’s about the connection between your eye, your hand, and the world in front of you.
So give it a try. Slow down. Breathe. Let your hand follow your gaze and see where it takes you.
And when you’re done, come back and tell us what surprised you most about the process. Did you find it meditative? Frustrating? Funny? Beautiful? All of the above?
Can’t wait to see your sketches!"
Until next time,
Escape Motions
----
Daniel Ibanez is a fine artist and illustrator who works out of beautiful Colorado. He grew up plein air painting mountain landscapes and western imagery. He has a love of painting the human figure, portraits, and landscapes. Daniel has worked on films, comics, video games, and tabletop games. While his range of subjects is diverse, all of his work is rooted in his traditional art background. He has been an oil painter since he was 13 years old. His work covers a wide spectrum of subjects, from sci-fi illustrations to alla prima landscapes. He has a digital portrait painting class with Domestika and a growing YouTube channel for tutorials and demonstrations. Find him on Instagram and say hello!
What do you think?
0 Responses
0
Upvote
0
Funny
0
Love
0
Surprised
0
Angry
0
Sad
Sign in to comment!
Be the first to comment.