

Last week we released Rebelle 6.0.9, another update with more new changes and fixes. In today's blog, let's look at the features we've added since the Rebelle 6 release that might have slipped under the radar, but we believe they deserve to be introduced properly as they can significantly improve your workflow in Rebelle and provide many new possibilities.
The new Smudge Density parameter
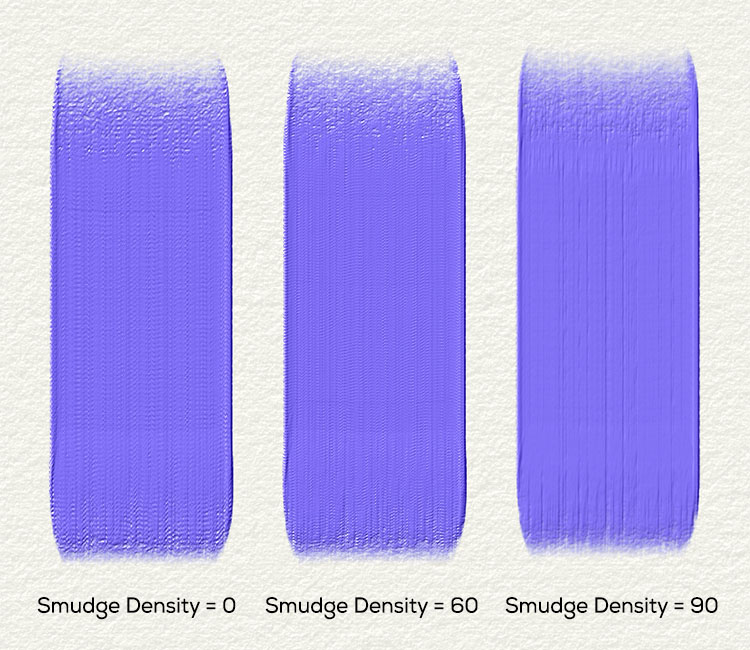
To achieve better results for smudging the brush splats in the brush stroke, we have implemented a new parameter called 'Smudge Density'. You can find it in the Brush Creator panel under the 'Stroke' section. This new parameter lets you control the brush stroke density detail when the Smudge is used.
The higher the value, the brush stroke is more detailed. In such a case, the painting may become slower for large brushes. The default value is set to '60'. When 'Smudge Density' is set to '90', the brushmarks are rendered on canvas with a maximum of 1 pixel distance, which is the recommended high-quality detail. When 'Smudge Density' is set over '90', the splats are rendered on canvas with a distance of less than 1 pixel.
This seems tough to comprehend without examples so here we go!
Paint & Mix and Paint & Blend modes for Layer masks
Since the Rebelle release layer masks allowed you to paint into them using only the Paint mode. The output from the rest of the painting modes was denied since we needed to work on more optimizations. Since Rebelle 6.0.9 you can paint into the mask also using 'Paint & Mix' and 'Paint & Blend' modes!
Adjust the opacity of the reference image
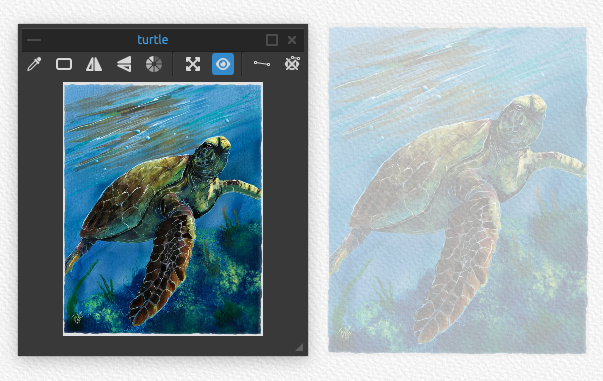
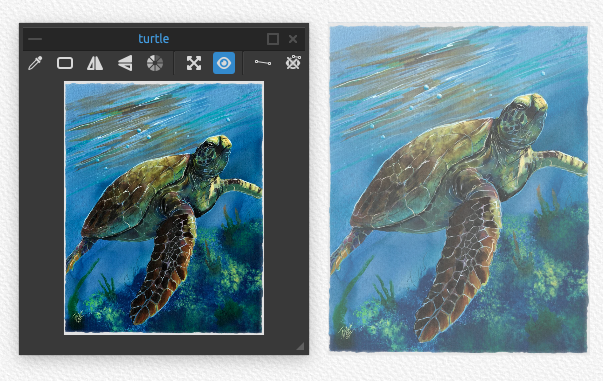
One of the improvements for the reference images is that you can now control the opacity of the reference image when shown on the canvas. This setting can be found in Preferences > Color > Reference Image > Preview.
This setting controls the opacity globally for all reference images placed on the canvas.
Added a new button for Reference Image to hide guides
The new reference image guides have been praised by Rebelle 6 artists as an amazing addition and we're so happy you like them! In the first versions, there was no easy way of hiding these guides directly from the canvas. Now, this is just one click away! To hide the reference image guides from the canvas, use the new button 'Show Guides' in the Reference image panel:
You can also use the shortcut 'Shift + Y' which is fully customizable in the Keyboard Preferences.
Faster image deformation with Liquify and Warp tools
Liquify and Warp tools are the newest and very much-needed additions to the Rebelle toolbox. They work with Fractal image processing which we have optimized to require less memory. That results in faster flow, faster response, and faster rendering of the Liquify and Warp tools.
Change the viewport's background color
Customization of the user interface has been upgraded and now you can not only change the user interface to a light theme, but you can also change the color of the viewport, which is the area behind the canvas. You can select any color from the range of the color palette. This will be super useful especially if you record your screen and need a certain color behind the canvas for post-production or just for adjusting the canvas color to make the appearance more pleasing to the eye.
If needed, you can always switch to the default color which is #6E6E6E.
Useful fixes of the user interface behavior
The user interface in Rebelle could have been problematic with a certain arrangement of panels. The main issue was that restarting Rebelle could reset your layout, costing you more time to fix it. We believe we found the solution and in the latest Rebelle 6.0.9, this should not be happening anymore. Now, Rebelle should remember the layout from the last session, no matter how the panels had been arranged, whether they are locked or not.
We hope this will save a lot of time and frustration on your end. Try it with your desired layout and let us know if it is working well.
Pen Eraser improvements
A small, but very useful feature! From now on, it is possible to use a stylus eraser not only as an eraser, but it could remember the last used tool. What does that mean? Well, by default, when you turn your stylus around to use the other tip, you will be able to erase. But for example, if you click with the eraser tip on the blend tool, you will be able to blend with it. To make Rebelle remember the last tool you used with the eraser tip, just go to Preferences > Tools and enable "For the Pen Eraser always use the last tool instead of the eraser". This gives you more possibilities you can do with your stylus and speed up your workflow!
It is also possible to change the size or opacity, and move the canvas while using the stylus eraser now.
Blur filters update
We have done some work on the field of the Rebelle filters too! We've upgraded the algorithm that is used for blurring, making the Gaussian Blur filter much faster and responsive to the changes you make in the Filter dialog window.
In addition, the Gaussian Blur filter has an enlarged radius which enables you to create more profound blur effects.
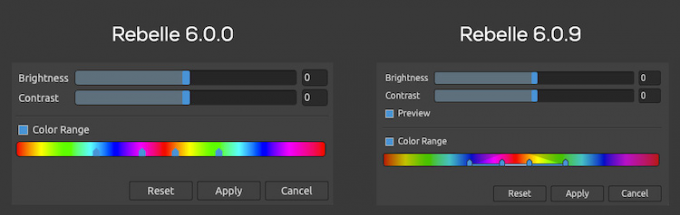
Updated Color range
Another great new feature of Rebelle 6 was the color range control for filters. We've put some more work into it since the release and now the color range has an updated user interface that is more practical to use:
We hope you're enjoying Rebelle 6 so far! What is your favorite feature? Let us know in the comments. :)
Keep it creative,
Your Escape Motions Team
----
Cover Image by LHOP
Images used in the blog: Sea Turtle by TNArtist | Jennifer Egan by ciaranm | The magic of a warm winter evening by Lergert
What do you think?
0 Responses
0
Upvote
0
Funny
0
Love
0
Surprised
0
Angry
0
Sad
Sign in to comment!
> Useful fixes of the user interface behavior
It's now perfectly fixed, I don't have to press "Import Layout" every time I start Rebelle, and it saves my time. Keep up the good work!