

Hello everyone! Rebelle 6 has just gotten a wonderful new update and we’re excited to tell you all about it. Rebelle 6.1 has just been released featuring many practical improvements we considered to be important for artist workflow.
These enhancements are based on your precious feedback as well as our own development roadmap. The update brings improvements to the overall painting experience, filters, layer masks, selections, user interface, and Brush Creator. Let's dive in:
Filters
Filters in Rebelle 6 get a huge update and also new filters have been added. The development team has outdone itself this time. :) Here's what's new:
- Levels - A new filter has been added for adjusting the tonal range and color balance of your artwork. Modify the intensity levels of shadows, midtones, and highlights in a current layer or a selection.

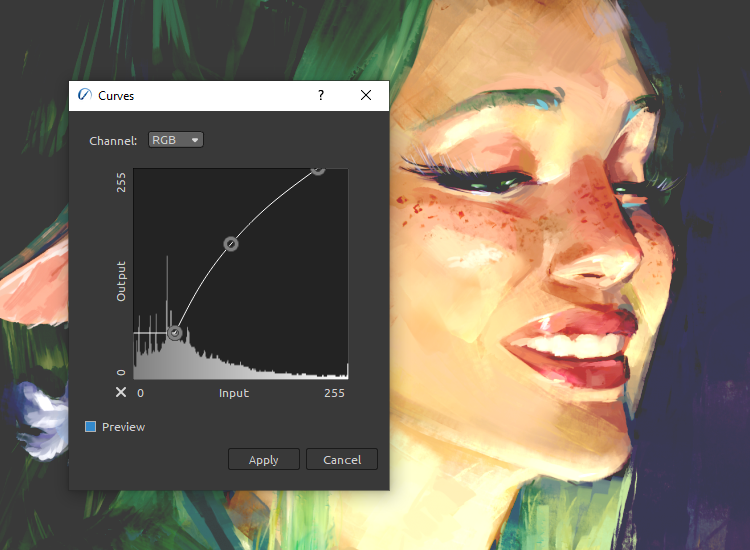
- Curves - Another new filter for adjusting the color, tone, and alpha channels with the curve adjustment, either on individual channels or by adjusting the master curve.
- Subtle Sharpen - New filter for the fast, subtle sharpening of images has been added - just select it in the Filter menu and the effect will immediately take place in your current project.
- Sharpen filters do not sharpen the oil impasto - We decided to rewrite the sharpen filters to not sharpen the impasto of oils since it did not look very neat.
- 'Pick Color' tool added for Color Range - The color range option for all color filters has gained an important 'Pick Color' tool so you can determine the desired color with more precision.

- Zoom and Pan canvas while using Filters - You can now zoom and pan the canvas even when the Filter dialog is on the screen, which was not possible in the previous versions.
Painting
New options have been developed for Rebelle 6.1 to help you experience the best practice while painting. Here are the newly implemented changes:
- New paint style: 'Automatically switch to Blend mode after using any Paint mode for wet media' - This new style has been implemented based on the feedback from many Rebelle artists who considered it to be the closest to the traditional painting. Feel free to try it by enabling the option "Automatically switch to Blend mode after using Paint, Paint & Mix, or Paint & Blend mode for wet media" via Preferences > Tools.
To continue painting, either pick a color from the canvas or the Color panel or use the new shortcut 'C' (Set Primary Color). This works excellently also when you set a shorter length of the stroke with the 'Length' slider. Let us know what you think about this newly added paint style.
- New shortcut for quick switch between Paint modes and Blend mode ('V') - We have added a new "V" shortcut for switching between Paint modes and Blend mode quickly and easily. You can change this shortcut to a custom one anytime via Keyboard Preferences. This is great especially when you tend to blend a lot during painting. In that case, you do not need to click shortcut '4' to get to the 'Blend' mode and then hit '2' to get to your paint mode, but instead, holding or tapping or 'V' back and forth does the trick. And it works with 'Paint', 'Paint & Mix', and also 'Paint & Blend'. Time saver!
- New option 'Use Primary Color' ('C') - When using 'Multicolored' or 'Dirty' brush, you can easily switch to the original, or as we call it, primary color using the shortcut 'C'. This color is mixed into the preset wash and will save you a lot of time when searching for the one you started painting with.
Note: The shortcut 'C' was previously assigned to the 'Clone' tool - its new shortcut is now 'Shift+C'.
- New option 'Clean Brush' - A highly requested feature that makes total sense! Using this option allows you to clean your 'Dirty' or 'MultiColored' brush from all the colors you added to it and get back to the original color. It has no assigned shortcut by default but you can create your own via Preferences > Keyboard > Color.
- 'Dirty brush' colors are not saved into Color history - Using the 'Dirty brush' in Rebelle is a great way of giving your stroke the touch of realness as if you are working with a real dirty paint brush. Rebelle used to remember all the colors loaded onto the brush and saved them into the color history. This could result in a history color panel being a mess filled with unnecessary colors. By default, this is not happening any longer meaning your dirty brush colors do not get into the color history. Rebelle 6.1 brings a new option to Preferences > Tools, that allows you to activate saving the dirty brush colors in the color history.

- Don't need to confirm the Pick Color tool with the mouse button - A new option in Preferences > Color > Pick Color allows you to pick colors only by hovering the cursor over the colors. Fast and easy way to pick the colors!
Layer Masks
We've worked on some new additions for layer masks too, and here's what has been added:
- Create a mask from the selection - This is a super useful feature. When there is a selection already active on canvas and you add a layer mask, it will create a layer mask in the shape of that selection.
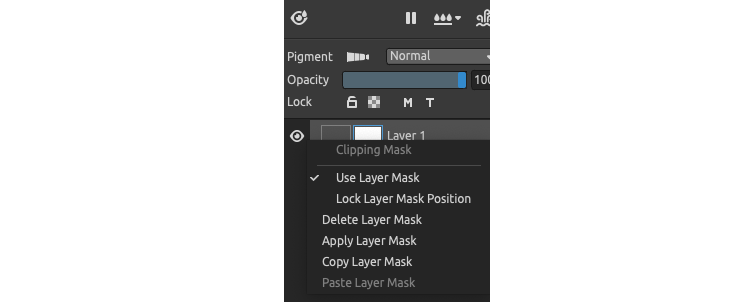
- New option 'Lock Layer Mask Position' - To prevent any unwanted changes in the position of your layer mask, you can now lock it with one click. Right-click the layer and activate 'Lock Layer Mask Position'.
- Copy & paste layer mask - You are able to copy and paste masks with 'Ctrl+C' / 'Ctrl+V' for some time. We have also added the commands to the context menu accessible via right-clicking the layer.
- Fill tool works with layer masks - You can now fill the entire layer mask or a selection on the layer mask with one click using the Fill tool! Will save you a lot of time, for sure. :)
User Interface
Many elements in the user interface get new functionalities that we know will be a great help for your workflow:
- Shortcuts for the first 10 brush presets in Favorites - This one hits home for many of you, we're sure! An amazing addition to Rebelle, now allows you to use shortcuts for the first ten brushes in your Favorites panel. We've assigned default shortcuts for the first four ('6', '7', '8', '9') - these and the next six can be customized via Preferences > Keyboard > Favorites. Switching between brushes has never been easier! Moreover, for the Favorite brush presets, the tooltip shows the original tool and the keyboard shortcut (if tooltips are enabled).
PRO TIP: Shortcuts 'Ctrl+1' - 'Ctrl+9' are not used yet. You may use them for your Favorite brushes. :)
- Open and Save Mixing Palette - Yes and Yes! Rebelle 6.1 allows you to save your mixing palette as a PNG image and open it in a new session! Save as many mixing palettes as you wish. Happy mixing!
- Size and Quality for JPEG - When saving a JPEG image, you can now adjust its size and quality. Just click File > Save As and select JPEG Image from the list - a new dialog window will pop up allowing you to adjust the quality and size in & or create a custom size of the JPEG output. Don't forget, the higher the quality, the bigger the size.

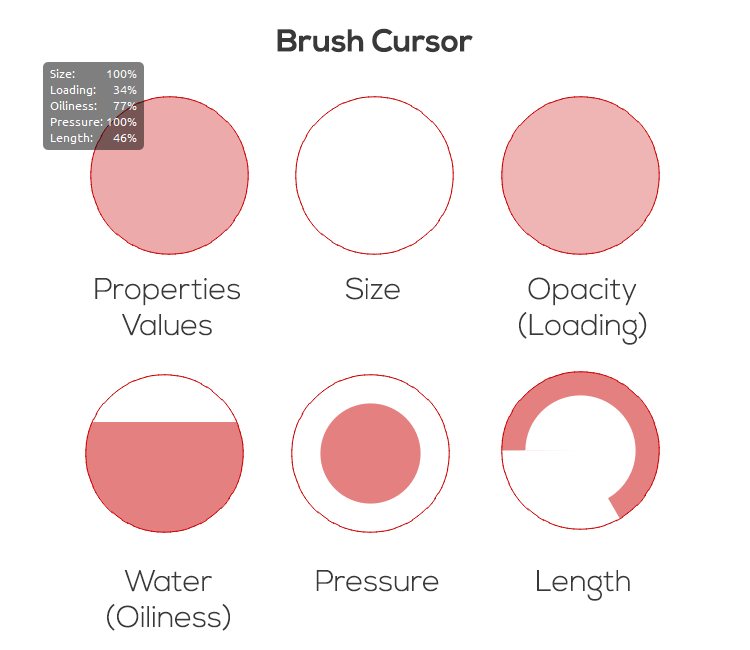
- Visual representation of the Properties' values in the brush cursor - In version 6.1, the changes in brush properties (Size, Opacity / Loading, Water / Oiliness, Pressure, and Length) will be visually shown in the cursor when changing these volumes via a shortcut or a slider. In addition, when changing the settings via the shortcut, an information window will also appear above the cursor and will display the status of the volumes available in the Properties panel. This is practical in Tablet mode or when using external devices like Xencelabs Quick Keys or Loupedeck controllers.
- Clone tool shortcut changes ('Shift + C') - Just a note that with the new tool for 'Clean Brush' (shortcut 'C'), we had to assign a new shortcut for the clone tool which is now 'Shift+C'.
Selections
One important feature has been added to Rebelle's Preferences:
- New option "Keep selection after pasting" - In Preferences, you can now choose how a selection should behave after you paste an image - the selection would be kept or removed after pasting. This is especially handy when you create a complicated selection that you do not want to lose. Also, remember, the selection gets saved with the REB file.
Brush Creator
We've done some work in the Brush Creator too, specifically:
- Changes in how blend modes are working (for example 'Lighten' mode) - This will allow a wider diversity in creating brush presets. For this, we had to update 6 default brushes: the Pastel group "Texture" with 4 brush presets and the Watercolor group "Granulation" with two presets. You can download these new brushes from this link. Import these brushes via File > Import Assets...

- Scale slider is more sensitive now - Adjusting the scale of the shape and grain of a selected brush preset was a new feature we introduced in the Rebelle 6 release. While it is super useful, it is now more sensitive for lower values so you can adjust the scale of the shape and grain with greater accuracy.
Additional Fixes:
- The watercolor diffusion horizontal line bug is fixed
- Pick Color tool is not snapping to grids anymore
- The Pressure sensitivity slider is now correctly saved to brush preset
- Alpha blending modes are not allowed anymore for tools that don't support them (e.g. Smudge, Water...)
- When Eraser mode is used and the color is picked from canvas, the last Paint mode is correctly set
- Lens Blur artifacts fixed
- Minor bug fixes related to brush preset textures
Go ahead and download the latest Rebelle 6.1 update from your Community profile. You can access the download links to the update also from within Rebelle 6, just go to the menu Help > Update to 6.1. This update is free for all Rebelle 6 users.
Share Your Feedback
How do you like these new features and changes brought by Rebelle 6.1? Which one do you find practical the most? Tell us what you think in the comments below!
Also, if you experience any issues, please notify us! You can either post to the online Forum or send a direct email to [email protected]. Lastly, you can use the feedback form accessible directly from Rebelle's menu: Help > Send Feedback.
Happy painting!
Your Escape Motions Team
----
Cover Image by Nickillus
Blog Images: Fearne Calloway by agatafiszer
What do you think?
0 Responses
0
Upvote
0
Funny
0
Love
0
Surprised
0
Angry
0
Sad
Sign in to comment!
cool
Now all I need is the time to experiment with this gorgeous program, and my xpen video tablet.
Genial que vayan actualizando, solo espero que hagan alguna promoción del producto ya que compre la versión 5 por su precio total y a los pocos meses la ofertaron por $10. Fue decepcionante ver que quienes apoyamos el producto no pudimos acceder al update 6 y tener que volver a pagar.
Not to be a downer on this update, but when is Flame Painter getting an update? Flame Painter is sorely in need of an update and it's a bit frustrating to see Rebelle continuing to get updates when it felt like Rebelle 5 hadn't even been out for that long when you released Rebelle 6. Rebelle is a great program, but Flame Painter is much more relevant to my needs, so I'm really hoping you don't abandon that software.
This is an amazing update! I feel like my biggest issues/requests with filters and layer masks were answered. Plus so many other great ideas. Thank you!